FiboSearch not only shows matching products in autocomplete, but also includes non-product results such as product categories, tags, and brands when using a compatible plugin or our custom solution. If you’d like to display matching terms from custom taxonomies – such as brands, attributes, book authors, artists, and more – you can easily achieve this by using custom snippets.
Table of Contents
- [Example 1] Show “Book Authors” in an autocomplete (custom taxonomy)
- [Example 2] Show “Case Pack Size” (product attribute) in an autocomplete
- Support for images
We present 3 examples, which cover different use cases.
[Example 1] Show “Book Authors” in an autocomplete (custom taxonomy)
This example is for an online bookstore, where books are the products and authors are the custom taxonomy. Assume that the name of the custom taxonomy is book_author. After following the steps below, users will be shown matching book authors (custom taxonomy terms) in an autocomplete.
Step 1 – Register your custom taxonomy in FiboSearch
Add the following snippet to your website. Replace book_author with your actual taxonomy name.
add_filter( 'dgwt/wcas/indexer/taxonomies', function ( $taxonomies ) {
	$taxonomies[] = 'book_author';

	return $taxonomies;
} );
ⓘLearn how to add this snippet to your WordPress.
Step 2 – Turn on “Show authors” in the FiboSearch settings
Go to WooCommerce → FiboSearch → Autocomplete (tab). The new checkbox called “Show authors” should appear under the section “Non-products in autocomplete”. Check it and save the settings.

Step 3 – Rebuild the search index
After saving the settings, the search index should start rebuilding automatically. Wait for it to finish.
Step 4 – Let’s see if it works
Check if terms from your custom taxonomy show up in an autocomplete. The results should look like this:

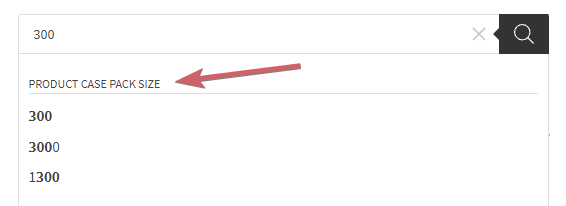
[Example 2] Show “Case Pack Size” (product attribute) in an autocomplete
Attributes in WooCommerce are custom taxonomies, and FiboSearch Pro can display them in the autocomplete search, similar to the example described in Example 1. To add an attribute to the search, simply replace book_author with the taxonomy name of the attribute you wish to include.
Step 1 – Find taxonomy name
A taxonomy name of an attribute has the form pa_{attribute_name}. In our case, we have an attribute with slug case-pack-size. This means that the taxonomy name is pa_case-pack-size.
Alternatively, you can check the URL address when you are on an attribute listing in the WordPress dashboard. Go to Products → Attributes and select the attribute. Take a look at the URL address:

Step 2 – Make sure your attribute has enabled archives
Go to Products → Attributes and click “Edit” below the attribute you want to add to the search. Make sure you have checked the checkbox “Enable archives?”.


Step 3 – Follow the steps from Example 1
The next steps are the same as in Example 1. The results should look like this:

Support for images
If you need support for images, see our other tutorial “How to search for brands?“. This tutorial describes how to integrate your custom brand solutions where the brand is a custom taxonomy. So it’s a very similar example to those described in this article and you can follow the steps. Remember to replace product_brand with your custom taxonomy name.